This is the eighth installment in a series about the upcoming total solar eclipse of April 8, 2024. Villagers are very fortunate to be directly aligned with the path.
How should one photograph the coming eclipse? For starters, you will need a clear view to the South between 158° and 232° at an angle of ~60 degrees or halfway up. You will also need the right equipment.
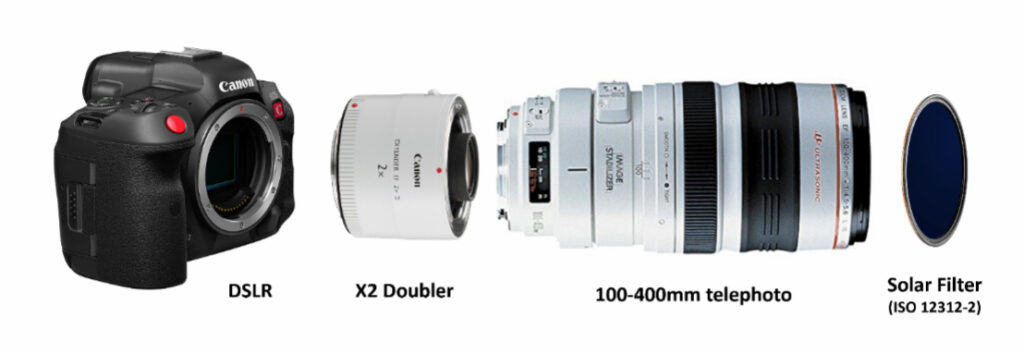
It is recommended you have a camera with manual settings. DSLR cameras are popular choices because they allow for manual control of exposure settings. A sturdy tripod is also needed to firmly hold your camera and a remote or internal timer (aka intervalometer) is also recommended to avoid camera jiggle when pressing the shutter button.
Next comes the selection of a camera lens. While any focal length will capture the event, you should choose one that produces the desired coverage. A camera lens with at least 300mm focal length is recommended, though 400mm – 500mm or greater is better. You can look at renting one if you don’t have a lens this length. Ideally, an 800mm lens will provide sufficient close-ups, while wider angle lenses will capture the surrounding landscape but smaller images of the Sun and Moon. Since many do not have a 500mm lens or greater, using a “doubler” on a lesser lens, i.e., 300 or 400mm zoom telephoto lens, with a 2x doubler can provide a magnification of 600 or 800mm.
Next, the absolute must-have before looking at or pointing your camera toward the Sun is a proper solar filter. A certified solar filter (ISO 12312-2 standard) is needed to protect your eyes, camera, and lens from the Sun’s harmful UV rays. You will need a solar ND filter of at least 16.5 stops. Select a filter that fits the size of your lens, and never photograph the Sun without a proper solar filter. Typically these filters screw onto the lens, but you can use a magnetized filter on a screw-in holder at the front of the lens. Then, instead of unscrewing the filter to remove it during totality, you can simply flip it off when it is not needed and not risk changing the focus. And, of course, a mandatory pair of “Solar” glasses to protect your own eyes.
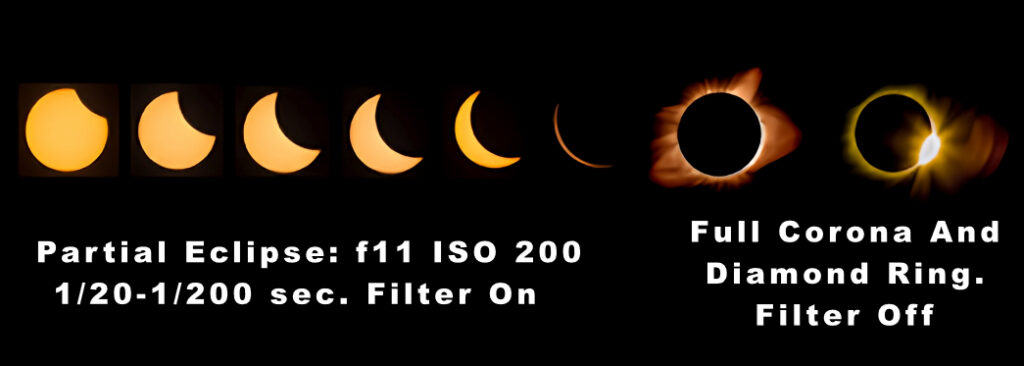
Set your camera mode to “manual” and focus manually using the sharper edges of the Sun’s orb or practice on the Moon or a bright star beforehand. Lock in your focus by placing a piece of tape on the focus ring to ensure it does not change when changing settings or taking the filter on or off. Use a low ISO setting of 100-200 to capture fine details and an aperture somewhere between f/5.6 to f/11. Your shutter speed should range from about 1/8th of a second during partial phases to 1/2000th at full eclipse upon removal of the solar filter. Using the AEB (Automatic Exposure Bracketing) feature of your camera will take several shots automatically at slower and faster shutter speeds and help capture your best shots when editing photos in post-processing after the event. White balance may be set for sunlight or ~5,500 o K. This is a no-fuss solution to camera settings. Using these settings simplifies adjustments such that only shutter speeds need to be changed as the eclipse unfolds. The best advice is to prepare and perfect your capture of the solar eclipse by practicing through trial and error ahead of time with the Sun shining and/or the Moon.
The HSV Camera Club and Village Stargazers will continue to post information articles on the solar eclipse. Next week, we will cover using other cameras, such as a Smartphone.


By HSV Camera Club and Village Stargazers
References:
The Amazing Sky by astronomy author and photographer Alan Dyer
How to Photograph a Solar Eclipse – Astrobackyard.com
How to Photograph a Solar Eclipse – bhphotovideo.com
Click here to read “2024 Total Solar Eclipse – Photographing Options.”
Click here to visit the HSV Camera Club website.
Click here to visit the Hot Springs Village Stargazers Facebook Page.


